Fillets, Chamfers and Edges
Basic fillets
When you manufacture a part, you often want to smooth off its sharp edges, so they're rounded and won't accidentally cut someone who holds it. We call this applying a fillet to an edge. Let's say we're modeling a cube, like this:
@settings(defaultLengthUnit = mm, kclVersion = 2.0)

// Sketch a square
width = 1
square = sketch(on = XY) {
  line1 = line(start = [width / 2, -width / 2], end = [width / 2, width / 2])
  line2 = line(start = [width / 2, width / 2], end = [-width / 2, width / 2])
  line3 = line(start = [-width / 2, width / 2], end = [-width / 2, -width / 2])
  line4 = line(start = [-width / 2, -width / 2], end = [width / 2, -width / 2])
}

// Extrude a cube.
regionCube = region(segments = [square.line1, square.line2])
extrudeCube = extrude(regionCube, length = width)
It produces a cube like this:
@settings(defaultLengthUnit = mm, kclVersion = 2.0)

// Sketch a square
width = 1
square = sketch(on = XY) {
  line1 = line(start = [width / 2, -width / 2], end = [width / 2, width / 2])
  line2 = line(start = [width / 2, width / 2], end = [-width / 2, width / 2])
  line3 = line(start = [-width / 2, width / 2], end = [-width / 2, -width / 2])
  line4 = line(start = [-width / 2, -width / 2], end = [width / 2, -width / 2])
}

// Extrude a cube.
regionCube = region(segments = [square.line1, square.line2])
extrudeCube = extrude(regionCube, length = width, tagStart = $startCap)

// Fillet one edge
filletCube = fillet(
  extrudeCube,
  // This uses an edge reference,
  // see the Edge Reference chapter for more.
  edges = [{ sideFaces = [regionCube.tags.line1, startCap] }],
  radius = 0.2,
)
The fillet function accepts an edges array. Each edge reference describes the faces around an edge. Here, the edge is shared by the side face created from line1 and the extrusion's startCap.
That program should produce a cube with one filleted edge, like this:
edges:
@settings(defaultLengthUnit = mm, kclVersion = 2.0)

// Sketch a square
width = 1
square = sketch(on = XY) {
  line1 = line(start = [width / 2, -width / 2], end = [width / 2, width / 2])
  line2 = line(start = [width / 2, width / 2], end = [-width / 2, width / 2])
  line3 = line(start = [-width / 2, width / 2], end = [-width / 2, -width / 2])
  line4 = line(start = [-width / 2, -width / 2], end = [width / 2, -width / 2])
}

// Extrude a cube.
regionCube = region(segments = [square.line1, square.line2])
extrudeCube = extrude(regionCube, length = width, tagStart = $startCap)

// Fillet all bottom edges
filletCube = fillet(
  extrudeCube,
  edges = [
    { sideFaces = [regionCube.tags.line1, startCap] },
    { sideFaces = [regionCube.tags.line2, startCap] },
    { sideFaces = [regionCube.tags.line3, startCap] },
    { sideFaces = [regionCube.tags.line4, startCap] },
  ],
  radius = 0.2,
)
@settings(defaultLengthUnit = mm, kclVersion = "3.0-preview", experimentalFeatures = allow)

// This is all the same as previous examples.
width = 1
square = sketch(on = XY) {
  line1 = line(start = [width / 2, -width / 2], end = [width / 2, width / 2])
  line2 = line(start = [width / 2, width / 2], end = [-width / 2, width / 2])
  line3 = line(start = [-width / 2, width / 2], end = [-width / 2, -width / 2])
  line4 = line(start = [-width / 2, -width / 2], end = [width / 2, -width / 2])
}
hide(square)
regionCube = region(segments = [square.line1, square.line2])
extrudeCube = extrude(
  regionCube,
  length = width,
  tagStart = $startCap,
  tagEnd = $endCap,
)

filletCube = fillet(
  extrudeCube,
  edges = [
    // Fillet the top edge
    { sideFaces = [regionCube.tags.line1, endCap] },
    { sideFaces = [regionCube.tags.line2, endCap] },
    { sideFaces = [regionCube.tags.line3, endCap] },
    { sideFaces = [regionCube.tags.line4, endCap] },

    // Bottom edges
    { sideFaces = [regionCube.tags.line1, startCap] },
    { sideFaces = [regionCube.tags.line2, startCap] },
    { sideFaces = [regionCube.tags.line3, startCap] },
    { sideFaces = [regionCube.tags.line4, startCap] },

    // Sides
    { sideFaces = [regionCube.tags.line1, regionCube.tags.line2] },
    { sideFaces = [regionCube.tags.line2, regionCube.tags.line3] },
    { sideFaces = [regionCube.tags.line3, regionCube.tags.line4] },
    { sideFaces = [regionCube.tags.line4, regionCube.tags.line1] },
  ],
  radius = 0.2,
)
Filleting tangential edges
By default, when you choose an edge to fillet, KCL will fillet all edges tangent to that too. That's because the fillet() function has an optional arg, tangentChain which defaults to true. Here's an example, where all the edges on the top have fillets, but only one of the bottom edges:
@settings(kclVersion = 3.0)

// Sketch and extrude a pill-shaped solid.
sketch001 = sketch(on = XY) {
  line1 = line(start = [var -2.78mm, var 0mm], end = [var -2.78mm, var -3.91mm])
  line2 = line(start = [var 2.78mm, var 0mm], end = [var 2.78mm, var -3.91mm])
  arc1 = arc(
    start = [var -2.78mm, var 0mm],
    end = [var 2.78mm, var 0mm],
    center = [var 0mm, var 0mm],
    direction = CW,
  )
  coincident([arc1.end, line2.start])
  coincident([line1.start, arc1.start])
  tangent([line1, arc1])
  arc2 = arc(start = [var -2.78mm, var -3.91mm], end = [var 2.78mm, var -3.91mm], center = [var 0mm, var -3.91mm])
  coincident([arc2.end, line2.end])
  coincident([line1.end, arc2.start])
  tangent([line1, arc2])
  vertical(line1)
  vertical(line2)
  vertical([arc1.center, arc2.center])
  equalLength([line1, line2])
  distance([line2.start, line2.end]) == 3.91mm
  radius(arc1) == 2.78mm
  coincident([arc1.center, ORIGIN])
}
hidden001 = hide(sketch001)
region001 = region(segments = [sketch001.arc2, sketch001.line2])
extrude001 = extrude(
  region001,
  length = 1,
  // Set tags for the top and bottom faces,
  // so we can easily fillet them later.
  tagEnd = $top,
  tagStart = $bottom,
)

// Because we leave `tangentChain` as its default (true),
// all the tangential edges around the top of the body
// get a fillet.
filletTop = fillet(
  extrude001,
  edges = [
    {
      sideFaces = [
        region001.tags.line2,
        extrude001.faces.top
      ]
    }
  ],
  radius = 0.2,
)


// Because we explicitly set `tangentChain = false`,
// only one of the tangential edges around the bottom of the body
// gets a fillet.
filletBottom = fillet(
  extrude001,
  edges = [
    {
      sideFaces = [
        region001.tags.line2,
        extrude001.faces.bottom
      ]
    }
  ],
  radius = 0.7,
  tangentChain = false,
)
tangentChain to true. Just turn it off by setting tangentChain = false if you need to.
Chamfers
A chamfer is just like a fillet, except that fillets smooth away an edge to make it round, while chamfers just make a single cut across an edge. Here's an example of the difference. Compare this chamfered cube with the filleted cubes above:
@settings(defaultLengthUnit = mm, kclVersion = 2.0)

// Same as previous examples
width = 1
square = sketch(on = XY) {
  line1 = line(start = [width / 2, -width / 2], end = [width / 2, width / 2])
  line2 = line(start = [width / 2, width / 2], end = [-width / 2, width / 2])
  line3 = line(start = [-width / 2, width / 2], end = [-width / 2, -width / 2])
  line4 = line(start = [-width / 2, -width / 2], end = [width / 2, -width / 2])
}
regionCube = region(segments = [square.line1, square.line2])
extrudeCube = extrude(regionCube, length = width, tagEnd = $endCap)

// Apply a chamfer
chamferedCube = chamfer(
  extrudeCube,
  edges = [{ sideFaces = [regionCube.tags.line1, endCap] }],
  length = 0.2,
)
Advanced chamfers
To define the chamfer, you only need to provide its length. But if you want more control of the chamfer angle, you can set the optional secondLength or angle parameters. Let's see how they work.
Chamfering cuts away at two faces, creating a third face in between them. By default, the chamfer cuts away an even amount from both sides, creating a chamfered face at a 45 degree angle. The amount cut away from each face is the length parameter. But you can make a chamfer that cuts different amounts from each face, using the secondLength or angle parameters. This diagram shows the cross-section of a cube being chamfered:
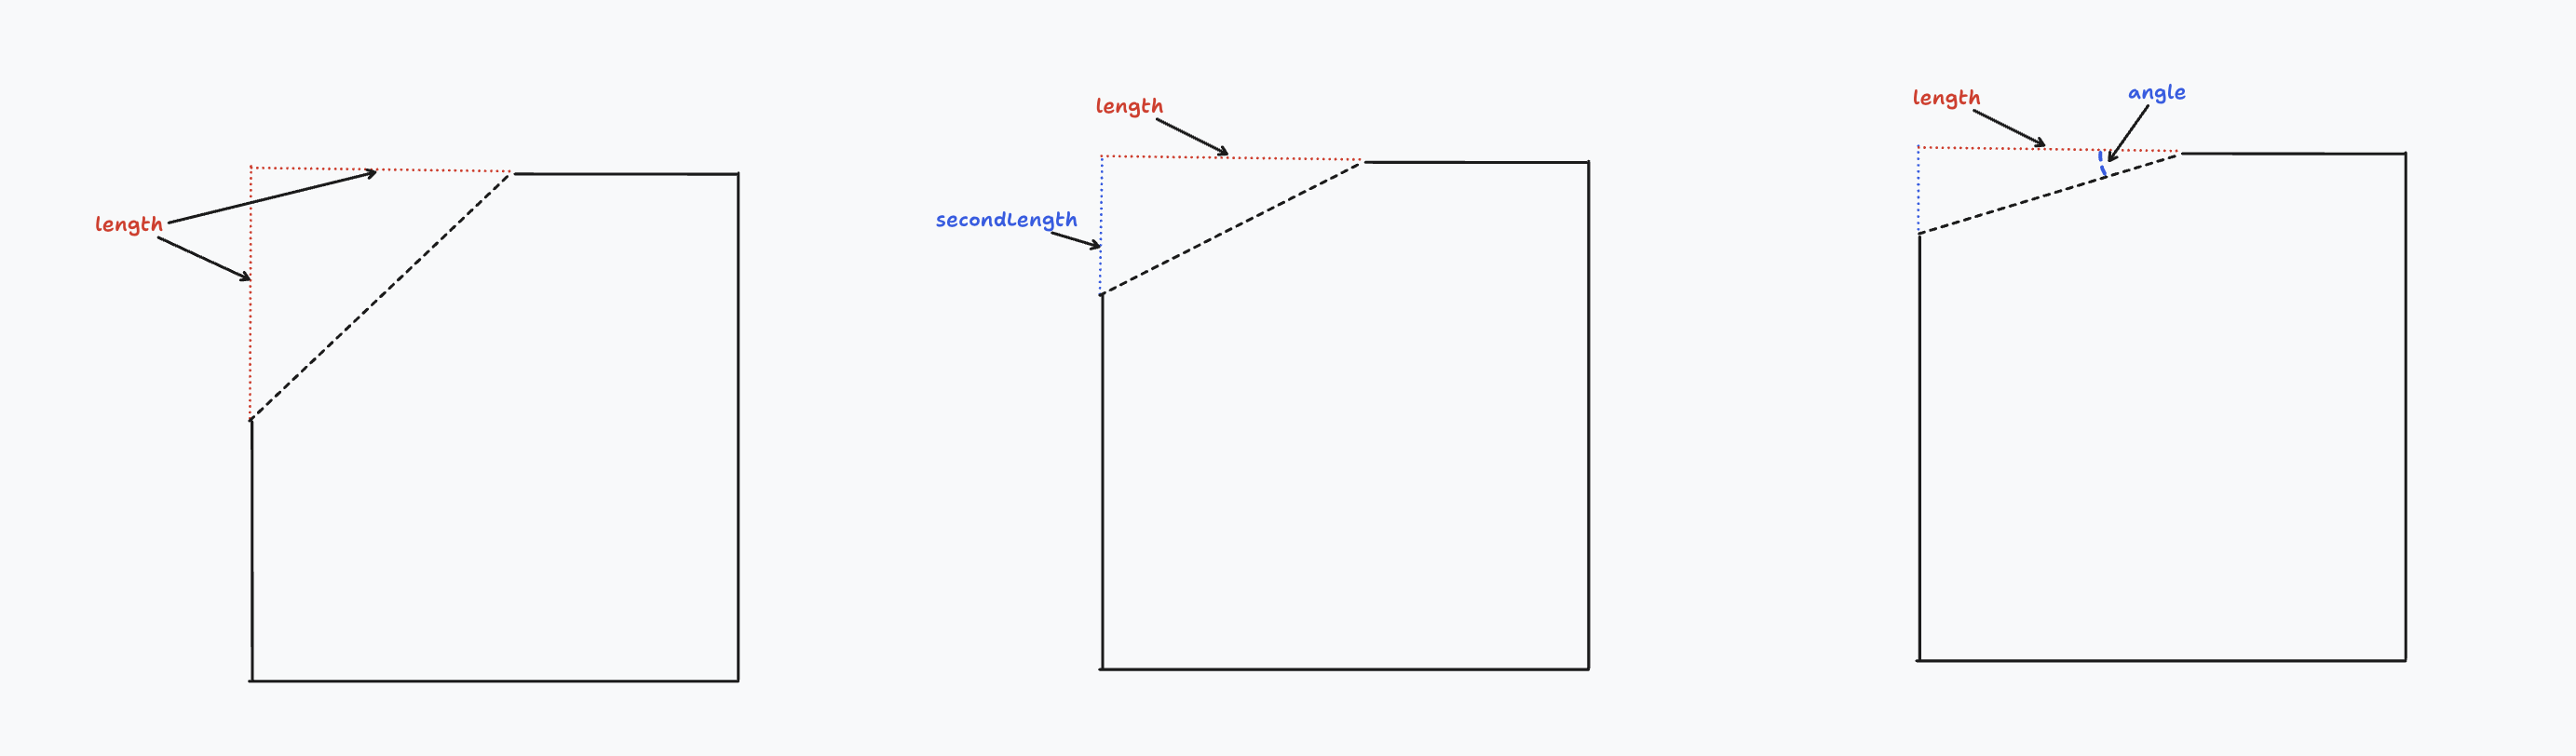
Setting a second length which is much bigger or smaller than the first length means the chamfer will be "steep" -- the new face will be at a very sharp (or very obtuse) angle between the existing two faces. You can also set this angle explicitly, via the angle parameter. You can't use both angle and secondLength because they're essentially two different ways of setting the same property.
Sketching on chamfers
Chamfering creates a new face. Just like any face, you can sketch on it! To sketch on the face of a chamfer, we just tag this new face, like this:
chamfer(mySolid, length = 1, tag = $myFace)
That tags the face, so we can refer to it later as myFace. Then we can sketch on it, like previously discussed in the Sketch On Face chapter.
@settings(defaultLengthUnit = mm, kclVersion = 2.0)

// Same as previous examples
width = 1
square = sketch(on = XY) {
  line1 = line(start = [width / 2, -width / 2], end = [width / 2, width / 2])
  line2 = line(start = [width / 2, width / 2], end = [-width / 2, width / 2])
  line3 = line(start = [-width / 2, width / 2], end = [-width / 2, -width / 2])
  line4 = line(start = [-width / 2, -width / 2], end = [width / 2, -width / 2])
}
regionCube = region(segments = [square.line1, square.line2])
extrudeCube = extrude(regionCube, length = width)

// Apply a chamfer
chamferedCube = chamfer(
  extrudeCube,
  tags = [getOppositeEdge(extrudeCube.sketch.tags.line1)],
  length = 0.2,
  // Add a tag to the chamfered face:
  tag = $myChamferedFace,
)

// Refer back to the tagged face
faceToSketchOn = faceOf(extrudeCube, face = myChamferedFace)

// Start sketching on that face.
triangle = sketch(on = faceToSketchOn) {
  line1 = line(start = [var -0.37mm, var 0.33mm], end = [var -0.2mm, var 0.47mm])
  line2 = line(start = [var -0.2mm, var 0.47mm], end = [var 0.26mm, var 0.29mm])
  coincident([line1.end, line2.start])
  line3 = line(start = [var 0.26mm, var 0.29mm], end = [var -0.37mm, var 0.33mm])
  coincident([line2.end, line3.start])
  coincident([line3.end, line1.start])
}
region001 = region(segments = [triangle.line1, triangle.line2])
extrude001 = extrude(region001, length = 0.4)
Measuring geometry
So we've learned to use sketch variables and face relationships to reference geometry elsewhere in the model. These variables aren't just used for altering edges. They provide a valuable way to query and measure your models. Let's see how.
Let's say you've got a solid triangle, like this:
// Make a triangle
@settings(defaultLengthUnit = mm, kclVersion = 2.0)

sketch001 = sketch(on = YZ) {
  line1 = line(start = [var 5.29mm, var -4.11mm], end = [var -4.31mm, var -4.11mm])
  line2 = line(start = [var -4.31mm, var -4.11mm], end = [var 0.49mm, var 5.14mm])
  coincident([line1.end, line2.start])
  line3 = line(start = [var 0.49mm, var 5.14mm], end = [var 5.29mm, var -4.11mm])
  coincident([line2.end, line3.start])
  coincident([line3.end, line1.start])
  equalLength([line2, line3])
  horizontal(line1)
}

// Extrude it
region001 = region(segments = [sketch001.line1, sketch001.line2])
extrude001 = extrude(region001, length = 1)
Let's ask a simple question. How long is each side of the triangle?
It sounds simple, but to actually calculate it, you'd have to break out a pencil and paper, then do some trigonometry. The problem is, the length doesn't appear anywhere in the line function call. The lines are defined by their start and end points, and the length is an implicit property of those. Defining lines as a start and end is helpful, but it means important properties, like length, can't be read from our source code.
However, tags give us a simple way to refer to each line, and then query them for properties like length with the segLen function. Let's update our program:
// Make a triangle
@settings(defaultLengthUnit = mm, kclVersion = 2.0)

sketch001 = sketch(on = YZ) {
  line1 = line(start = [var 5.29mm, var -4.11mm], end = [var -4.31mm, var -4.11mm])
  line2 = line(start = [var -4.31mm, var -4.11mm], end = [var 0.49mm, var 5.14mm])
  coincident([line1.end, line2.start])
  line3 = line(start = [var 0.49mm, var 5.14mm], end = [var 5.29mm, var -4.11mm])
  coincident([line2.end, line3.start])
  coincident([line3.end, line1.start])
  equalLength([line2, line3])
  horizontal(line1)
}
// Extrude it
region001 = region(segments = [sketch001.line1, sketch001.line2])
extrude001 = extrude(region001, length = 1)

// Measure its side lengths
side1Len = segLen(extrude001.sketch.tags.line1)
side2Len = segLen(extrude001.sketch.tags.line2)
side3Len = segLen(extrude001.sketch.tags.line3)
Now you can open up the Variables pane and look at the side1Len, side2Len and side3Len variables to find each side's length. That's pretty useful! And if you want to use those lengths elsewhere in your code, you can! You could start drawing lines where the end is [side1Len, 0] for example, or plug those lengths into other calculations.
There are other helpers too, like segStart and segEnd to find a line's start and end, respectively. Take a look at the KCL standard library docs to find them all.